Landing Pages
Create high-converting landing pages that serve as the entry doors to your business, transforming visitors into leads and customers through strategic design and compelling messaging.
1. Goal - Building pages that convert
Where You're Building From
In the Funnel Overview lesson, you designed your complete funnel strategy – your lead magnet, your three-tier pricing structure, and whether you're focusing on low-touch self-serve or adding high-touch sales. Now it's time to build the actual pages where these conversions happen.
What You're Deciding Here
This lesson helps you make two critical decisions:
-
What tool will you use to build your landing pages? There are two main paths:
- No-code approach (WordPress, Wix, Webflow) – Visual builders, templates, no code required. Great if you're not technical and want something live fast.
- Build-with-Claude approach (Claude Code in the Claude desktop app) – Full control and fast iteration, with Claude doing the actual building. You describe what you want in plain English and Claude writes the code, runs everything, and shows you a live preview. No terminal, no setup commands on your side.
-
Which pages will you build first? You need:
- Lead magnet page – Captures email addresses in exchange for your free offer
- Sales pages – Convert leads into customers (low-tier, mid-tier, and potentially high-tier)
What Should You Build First?
Your landing page build order should match your funnel strategy:
For Everyone (Start Here)
Build your lead magnet page first. This is your entry point – where people discover you and join your ecosystem. It's typically the simplest page (just headline, benefits, and email capture), so it's a great place to start and learn your tool.
Next: Sales Pages in Order
- Low-tier page ($50-$300 one-time offer) – For those coming from your lead magnet, this is your break-even product
- Mid-tier page ($30-$300/month subscription) – Your main revenue generator, where the real business happens
- High-tier page ($10k-$50k+/year) – For premium customers and enterprise deals (build this later, once mid-tier is working)
Choosing Your Tool
Your tool choice depends on your technical comfort and how you prefer to work:
- Choose no-code (WordPress / Wix / Webflow) if you want visual editing, pre-built templates, and zero code. This is the right call for most non-technical marketers who just need pages live.
- Choose build-with-Claude (Claude Code in the Claude desktop app) if you want full control over a fast, custom page and prefer to direct the build through chat. You don't need to know how to code – Claude writes it, runs it, and previews it for you. There are no terminal commands you have to type.
Either path works for everything in this lesson. The strategy, structure, and copy below are tool-agnostic – you'll use the same blocks and messaging regardless of how you build. We cover the build-with-Claude path in detail in Section 6, and you can go even deeper in the Build Codex if you want to ship a full product, not just landing pages.
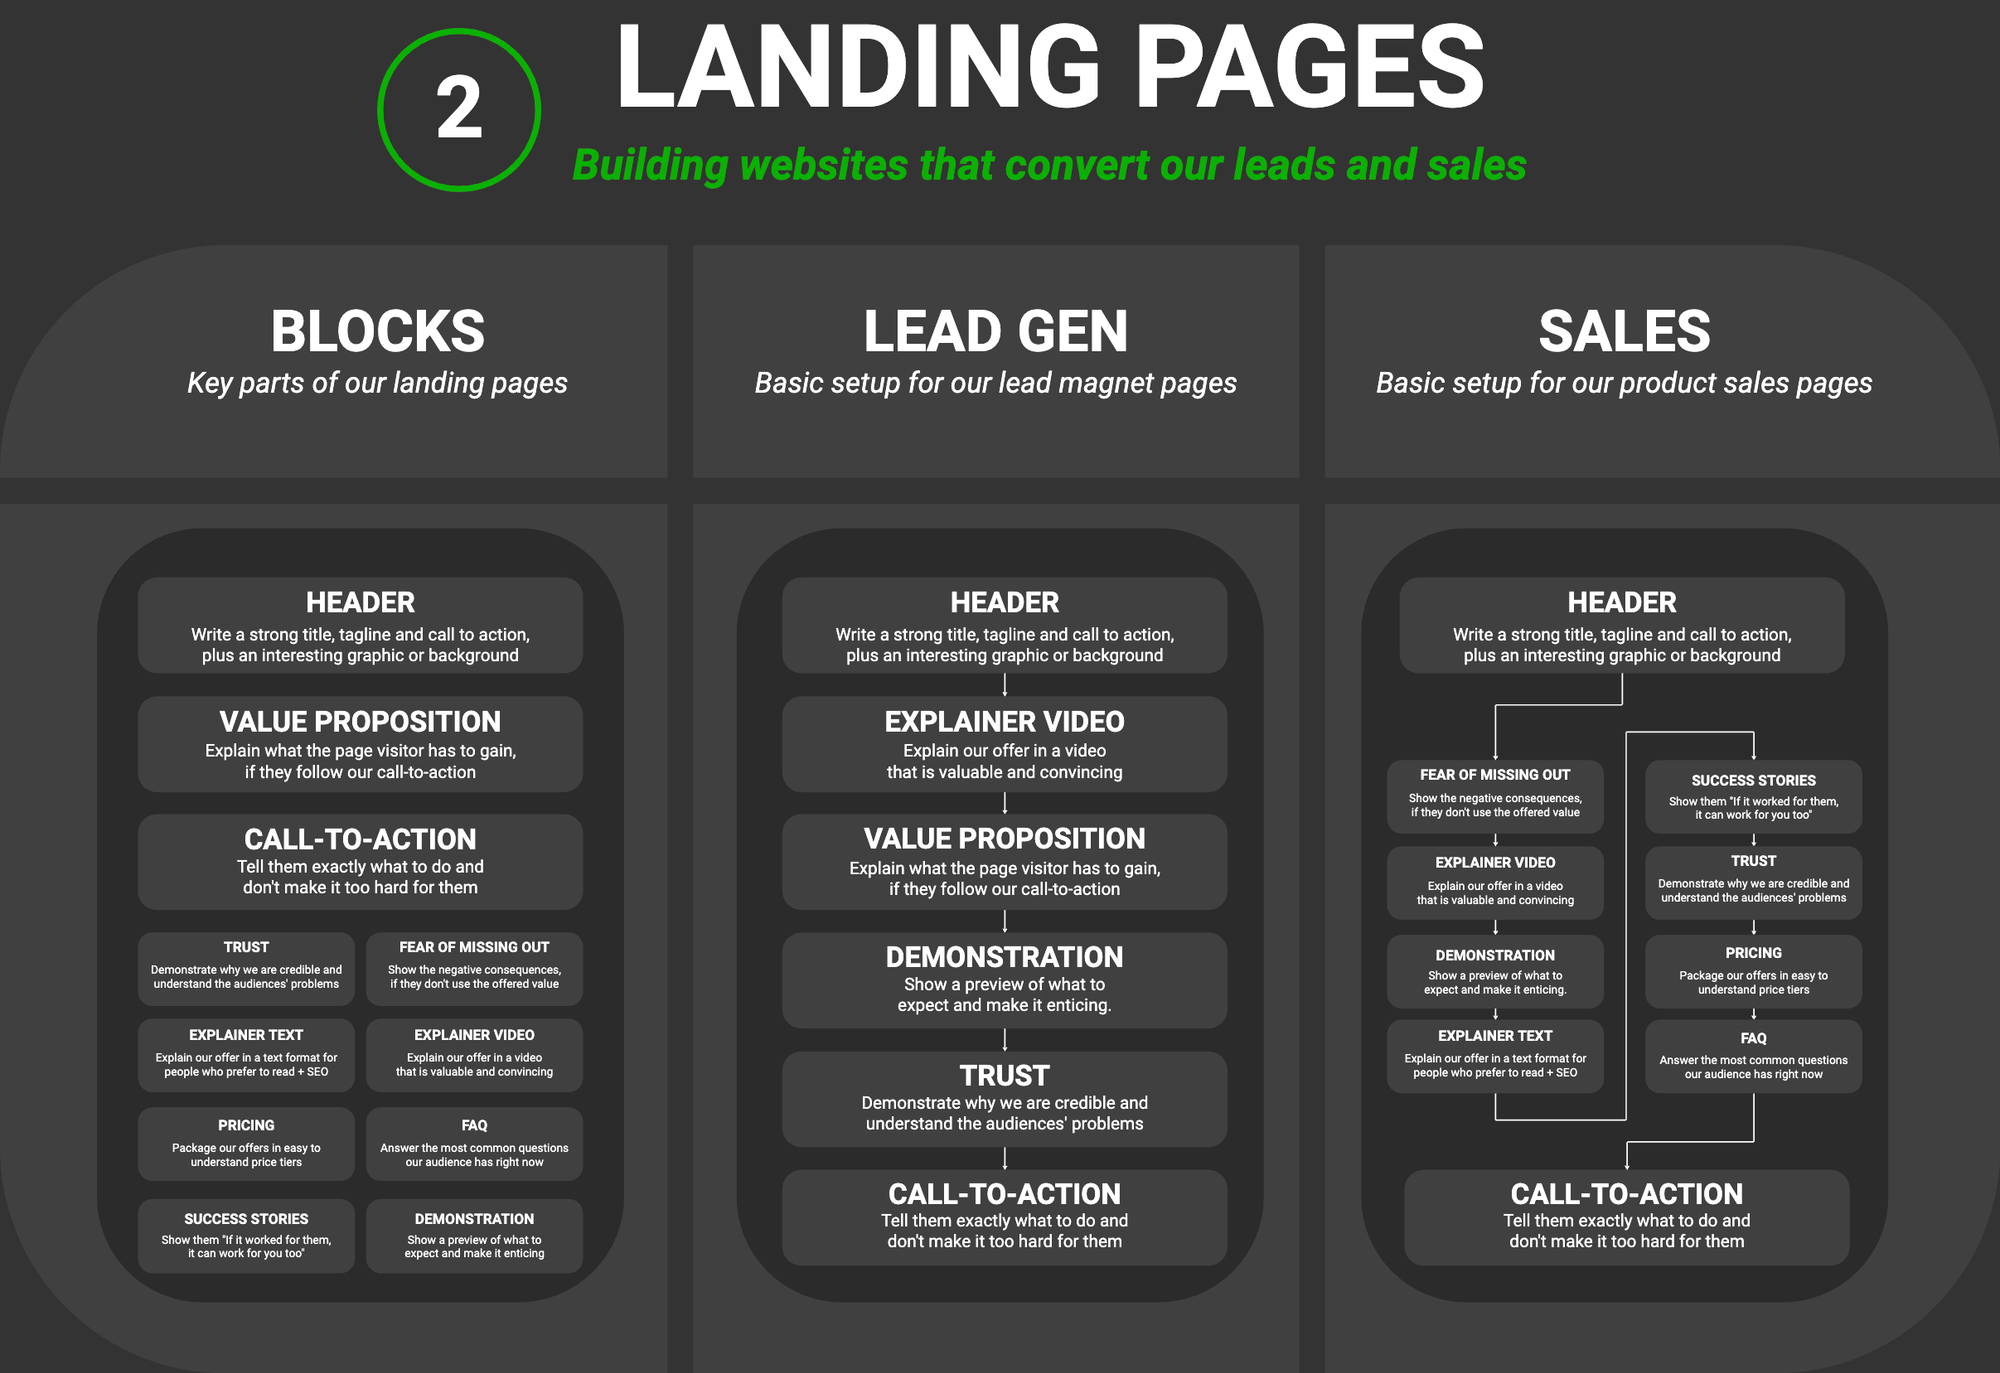
2. Blocks - Key parts of our landing pages
Understanding Landing Page Architecture
Every high-converting landing page is built from full-width sections (blocks) that work together to guide visitors toward taking action. Think of these as the building blocks you stack vertically on your page to create the complete experience.
The Complete Set of Landing Page Blocks:
-
Header (Hero Section)
- Strong title that captures attention immediately
- Tagline/subheadline that expands on the value proposition
- Call-to-action button prominently displayed
- Interesting graphic or background image
-
Value Proposition
- Explain what the page visitor has to gain
- Clear articulation of benefits (not just features)
- Why this matters to them specifically
-
Call-to-Action (CTA)
- Tell them exactly what to do
- Don't make it too hard for them
- Action-oriented button copy
- Can be repeated at strategic points throughout the page
-
Trust
- Demonstrate why you are credible
- Show you understand the audience's problems
- Trust indicators (certifications, partnerships, credentials)
- Authority signals and expertise
-
Fear of Missing Out (FOMO)
- Show the negative consequences if they don't use the offered value
- What they lose by not taking action
- Urgency or scarcity elements (when authentic)
- The cost of staying where they are
-
Explainer Text
- Explain your offer in text format
- For people who prefer to read
- Good for SEO and accessibility
- Detailed breakdown of how it works
-
Explainer Video
- Explain your offer in video format
- More engaging and convincing for visual learners
- Can show product demo or process
- Builds connection through face-to-face communication
-
Pricing
- Package your offers in easy-to-understand price tiers
- Clear structure showing what's included at each level
- Transparent pricing builds trust
- Highlight recommended tier
-
FAQ
- Answer the most common questions your audience has right now
- Address objections before they become blockers
- Builds confidence and reduces friction
- Shows you understand their concerns
-
Success Stories
- Show them "If it worked for them, it can work for you too"
- Customer testimonials and results
- Before/after transformations
- Case studies with specific outcomes
-
Demonstration
- Show a preview of what to expect
- Make it enticing and tangible
- Screenshots, walkthroughs, or previews
- Reduce uncertainty about what they're getting
Simplicity vs. Depth
Not every page needs every block. The key is matching your blocks to your page's purpose and the commitment level you're asking for:
- Lead magnet pages (low commitment, free offer): Header + Value Proposition + CTA + Trust (typically 3-5 blocks)
- Low-tier sales pages ($50-$300): Add Explainer Text/Video + Pricing + FAQ (typically 5-7 blocks)
- Mid-tier sales pages ($30-$300/month): Add Success Stories + FOMO + Demonstration (typically 7-9 blocks)
- High-tier sales pages ($10k-$50k+/year): Use all blocks for maximum trust and detail (typically 9-11 blocks)
Outcome: You have identified the essential landing page blocks for each of your pages.
3. Lead Gen - Lead magnet landing page
The Purpose of Lead Generation Pages
Lead magnet pages have one job: capture contact information in exchange for valuable content. These pages should be focused, free of distractions, and optimized for a single conversion goal – getting the opt-in.
Optimal Lead Magnet Page Structure:
Above the Fold:
- Benefit-driven headline answering "What will I get?"
- Subheadline providing more context
- Image of the lead magnet (ebook cover, worksheet preview, etc.)
- Simple opt-in form (typically just name and email)
- Clear CTA button ("Download Now", "Get Instant Access")
Supporting Elements:
- Brief bullet points highlighting key benefits or what's inside
- Social proof if available (number of downloads, testimonials)
- Trust indicators (no spam promise, privacy statement)
What to Avoid:
- Navigation menus (reduce exit points)
- Multiple offers or CTAs (maintain focus)
- Excessive form fields (lower conversion by 25-50%)
- Generic headlines that don't communicate value
The Conversion Principle
The simpler and more focused your lead magnet page, the higher your conversion rate will typically be. Every element should either support the conversion or be removed. Aim for clarity over creativity – visitors should understand what they're getting and why they want it within 3 seconds of landing on the page.
Outcome: You have complete copy and structure for your lead magnet landing page.
4. Sales - Product sales landing pages
The Purpose of Sales Pages
Sales pages need to do more than capture attention – they must persuade, overcome objections, and compel action. Unlike lead magnet pages, sales pages often require more depth because you're asking for a bigger commitment (money).
The Three-Tier Sales Page Approach
Based on your Funnel Overview, you need sales pages for your three-tier structure:
- Low-Tier Page ($50-$300 one-time) – Break-even product, simpler page, quick decision
- Mid-Tier Page ($30-$300/month) – Main revenue generator, needs to justify recurring payment
- High-Tier Page ($10k-$50k+/year) – Premium offering, most detailed page, highest trust required
Key Elements Across All Sales Pages:
- Problem Agitation: Describe the pain point vividly
- Solution Introduction: Position your product as the answer
- How It Works: Break down the process or methodology
- What's Included: Detailed module/feature breakdown
- Transformation: Show the before/after state
- Social Proof: Multiple testimonials, case studies, results
- Pricing: Clear structure with what's included
- Guarantee: Risk reversal to overcome purchase anxiety
- FAQ: Address common objections and questions
- Final CTA: Strong, benefit-focused call to action
Matching Depth to Price
The higher the price, the more detail, proof, and trust-building you need:
- Low-tier ($50-$300): Focus on quick value, simple structure, fast decision
- Mid-tier ($30-$300/month): Emphasize ongoing value, show ROI over time, highlight support
- High-tier ($10k-$50k+/year): Maximum detail, video demos, case studies, personal touch, possibly sales call CTA
Pricing Transparency
We recommend displaying prices directly on your sales pages. Yes, it might reduce inquiry volume, but it attracts more qualified leads who understand the investment. This saves everyone time and ensures better-fit customers.
Build What You Need Right Now
You don't need to create all three sales pages at once. Work on them in priority order based on your funnel strategy. Most start with low-tier (break-even offer), then mid-tier (main revenue), and add high-tier later as they scale.
Low-Tier Sales Page ($50-$300 one-time)
This is your break-even product – designed to recover customer acquisition costs from paid advertising while providing genuine value. It's typically your first sales page to build after your lead magnet page.
Outcome: You have complete copy and structure for your low-tier sales page.
Mid-Tier Sales Page ($30-$300/month subscription)
This is your main revenue generator – the subscription that creates predictable, recurring income. This page needs to justify the ongoing monthly commitment and show value over time.
Outcome: You have complete copy and structure for your mid-tier sales page.
High-Tier Sales Page ($10k-$50k+/year)
This is your premium offering – for customers who need the highest level of service, customization, or scale. This page has the most detail and trust-building elements, and may include a sales call CTA instead of direct purchase.
Outcome: You have complete copy and structure for your high-tier sales page.
5. Your Landing Page Blocks Library
Creating Your Reusable Component Library
You've created the complete copy for all your landing pages. Now it's time to extract and organize all those building blocks into a reusable library – a component library with example copy that you (or AI) can quickly reference to build landing pages in hours, not days.
What This Library Includes
Your Landing Page Blocks document will extract and organize:
- All 11 landing page blocks (Header, Value Prop, CTA, Trust, FOMO, etc.)
- Example copy for each block from your pages
- Multiple variations (lead magnet, low-tier, mid-tier, high-tier examples)
- Ready-to-use components that AI can quickly adapt
Why This Matters
With this blocks library, you can:
- Build new landing pages in 1-2 hours instead of days
- Give Claude complete context for writing copy or generating components
- Maintain consistency across all your pages
- Quickly test new page variations
- Reuse proven copy patterns across different offers
This isn't a plan document – it's a component library that enables rapid page development.
Outcome: You have a reusable Landing Page Blocks library that enables you to build landing pages in 1-2 hours.
6. Build It - Ship the page with Claude Code
You've got the copy and the blocks. Now let's actually build the page. If you went with a no-code builder (WordPress, Wix, Webflow), you already know the drill: drop your blocks into a template, paste in the copy, connect your email tool, hit publish. That path is perfectly fine and it's what most non-technical marketers should use.
If you want a fast, fully custom page and don't want to wrestle with a builder's templates, you can have Claude build it for you – with no coding on your part. This is the modern "vibe coding" path, and it all happens through chat in the Claude desktop app. You describe the page, Claude writes the code, runs everything, and shows you a live preview. There are no terminal commands you ever type.
This section teaches the essentials so you can ship a real page here. If you want to go further and build a whole product around it (auth, payments, a full app), the Build Codex walks the complete workflow step by step.
What you need
- The Claude desktop app with a paid Claude plan (Pro or Max). No API key, no terminal.
- Your page copy and Landing Page Blocks library from the sections above, ready to paste or attach.
The build loop: plan → build → preview → iterate
You'll always work in the same rhythm. Plan the page first so you agree on the approach before any code is written, then let Claude build it, preview it, and refine it with you.
Step 1: Install the skills Claude needs
A skill is a reusable expert playbook – how to build a clean Next.js page, how to use shadcn/ui components, how to deploy to Vercel. Installing the right skills up front means Claude builds the modern, correct way instead of guessing. It all happens in the app through chat – no terminal for you.
Ask Claude in the chat:
- "Install the Vercel plugin." This bundles the skills for our stack (Next.js, Tailwind, shadcn/ui, deployment) in one step.
- "Install the shadcn skill." This gives Claude the up-to-date component library we'll use for the UI.
After installing skills, start a new chat so they load.
Step 2: Plan the page in plan mode
Before any code, switch Claude to plan mode (press Shift+Tab in the desktop app). Plan mode lets Claude propose an approach and ask you questions without changing any files yet – so you shape the page together first. This is a collaborative, hand-holding step: Claude should ask about your stack and your goal, not just start building.
Step 3: Build it with Tailwind + shadcn/ui
Once you've agreed on the plan, tell Claude to build it. Claude writes the code, installs whatever it needs, and runs the project for you – all through the app. You stay in the conversation; you don't touch a terminal.
Step 4: Preview, iterate, and deploy to Vercel
Claude shows you a live preview as it builds. Look at it on desktop and mobile, then refine in plain English – this is where the real polish happens. Treat it like working with a designer who acts on every note instantly.
Good iteration prompts (just type them in the chat):
- "The hero headline is too small on mobile – make it bigger and add more breathing room."
- "Move the pricing section above the FAQ and add a 'Most Popular' badge to the middle tier."
- "The CTA button doesn't stand out enough. Make it the primary brand color and repeat it after the testimonials."
When you're happy, ask Claude to deploy to Vercel so you get a real, shareable URL:
Once it's live, you have a real landing page on a real URL – built entirely through chat, no code written by you and no terminal commands. Iterate the same way any time: open the chat, describe the change, preview, redeploy.